Navigation
Install the app
How to install the app on iOS
Follow along with the video below to see how to install our site as a web app on your home screen.
Note: This feature may not be available in some browsers.
More options
-
Welcome to the Yamaha FZ1 Forums. Member registration disables ads and allows you to post and share. Register Here.
You are using an out of date browser. It may not display this or other websites correctly.
You should upgrade or use an alternative browser.
You should upgrade or use an alternative browser.
What did you do to your Non-FZ1 motorcycle today.
- Thread starter johnnyontherocks
- Start date
Oldschool
Moderator
Well damn, that sucks!
Just chalk it up to learning, and sometimes that costs money, been there, done that. At least it was in the shop and not off in the bush somewhere. Their are a lot more expensive mistakes that could have been made. A friend just crashed his brand new 690 forgetting about gravel on the roads, and poked a footpeg into his leg. I wish I could un-see the picture...
I fought with the 150/70/18 rear tire on my bike a few times, even started to tear cords. This was trying to force the last bit of bead over the rim with a second tire iron keeping the other end from popping back over. This happens with stiff sidewalls when the opposite bead doesn't come up to the center, lower spot on the rim (where the spokes come through). I learned after that experience to lube the beads better including just inside the tire and to let the side I'm working on chase the iron that I'm working with for the last bit. It allows the opposite side to pull up where it needs to. It takes practice. It also helps if the tire is warm when you do it; I leave my new tires sitting in the sun for about half an hour in the summer before I install them. In the winter I lean them against the front of my car as soon as I get back from the store allowing the heat from the engine and radiator to warm them. I guess a heat lamp would work as well.
Out on the road, when I've had a flat the tire is typically very warm when I have to take it off so it's easy.

It helps if your patch glue isn't a solid block. Then it's good to have a spare tube.

Viola
Just chalk it up to learning, and sometimes that costs money, been there, done that. At least it was in the shop and not off in the bush somewhere. Their are a lot more expensive mistakes that could have been made. A friend just crashed his brand new 690 forgetting about gravel on the roads, and poked a footpeg into his leg. I wish I could un-see the picture...
I fought with the 150/70/18 rear tire on my bike a few times, even started to tear cords. This was trying to force the last bit of bead over the rim with a second tire iron keeping the other end from popping back over. This happens with stiff sidewalls when the opposite bead doesn't come up to the center, lower spot on the rim (where the spokes come through). I learned after that experience to lube the beads better including just inside the tire and to let the side I'm working on chase the iron that I'm working with for the last bit. It allows the opposite side to pull up where it needs to. It takes practice. It also helps if the tire is warm when you do it; I leave my new tires sitting in the sun for about half an hour in the summer before I install them. In the winter I lean them against the front of my car as soon as I get back from the store allowing the heat from the engine and radiator to warm them. I guess a heat lamp would work as well.
Out on the road, when I've had a flat the tire is typically very warm when I have to take it off so it's easy.

It helps if your patch glue isn't a solid block. Then it's good to have a spare tube.

Viola
Last edited:
tombraider2
Wizard
Well crud, I won't be ( practicing ).
Oldschool
Moderator
Well crud, I won't be ( practicing ).
If you were closer I'd be happy to help you with them. Videos are helpful, but showing someone, hands-on is much better.
[video=youtube;m3gC2__Rxi0]https://www.youtube.com/watch?v=m3gC2__Rxi0[/video]
This is a wheel with a Rim lock making it just slightly more difficult. Otherwise a decent video. He doesn't lube the inside edge of the tire and it catches on the rim a bit. The bead buddy is nice but not necessary either.
Last edited:
tombraider2
Wizard
Normally I just kill the tube but this time was the last.
tombraider2
Wizard
I forgot about this, if I had stood on tire to keep in the middle of wheel I'da not had an issue Neduro's Tire Changing Class | Adventure Rider
Oldschool
Moderator
Normally I just kill the tube but this time was the last.
Don't let that beat you, practice with an old tire and tube, when you are bored or have nothing else better to do. It really could save your butt out on the trail one day.
I forgot about this, if I had stood on tire to keep in the middle of wheel I'da not had an issue Neduro's Tire Changing Class | Adventure Rider
Yep, I'll kneel on the upper part of a stiffer tire when needed. Stiff, low profile tires are tough.
tombraider2
Wizard
After watching that Video I'm about ready to buy another and do it.. I don't pack tools, but have a plug kit in the Super Tenere seeing how it's got bags..
Dustin
Moderator
Just finished servicing my rear brakes. Everything was pretty grimy, the pistons were gross and the sliding pins were looking a wee bit dry. I took care of all that and added a bit of anti-seize to the mounting pin
I also decided to switch from motor oil to a heavy gear oil for my chain oiler. I've been experimenting with different oils to see what works best and have gone from a 0w20 motor oil to a 20w50 and now I'm going to try an 80w90 gear oil. Incidentally, Honda actually recommends 90 weight gear oil to lubricate the chain anyway. Let's see how it works.
I also decided to switch from motor oil to a heavy gear oil for my chain oiler. I've been experimenting with different oils to see what works best and have gone from a 0w20 motor oil to a 20w50 and now I'm going to try an 80w90 gear oil. Incidentally, Honda actually recommends 90 weight gear oil to lubricate the chain anyway. Let's see how it works.
Last edited:
Oldschool
Moderator
After watching that Video I'm about ready to buy another and do it.. I don't pack tools, but have a plug kit in the Super Tenere seeing how it's got bags..
Just remember; Brute force is not required. Don't force it, it should be easy. More lube if not and get a buddy (especially if your buddy is as pictured below) that has done it before to help you. Still talking about tires here.

It about technique not muscles. Note the knees on the tire opposite the area being worked with the irons.
Try it with an old tire first. The rim will be nice and slippery for the new tire then.
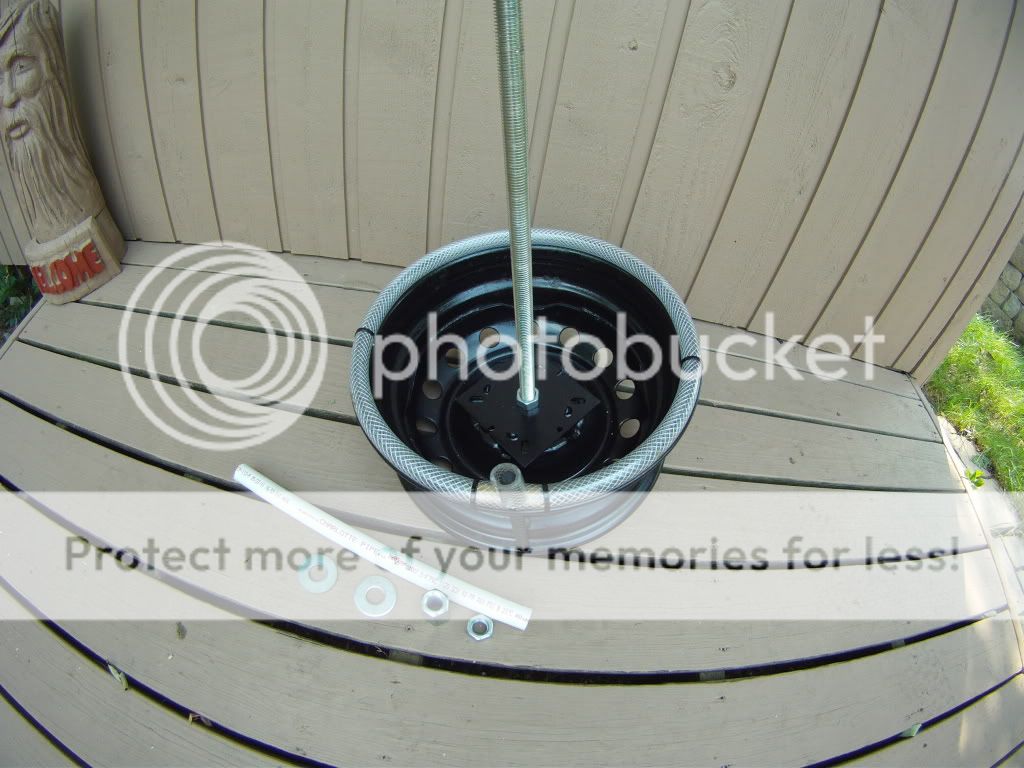
An old steel car-wheel 15 or 16" (hollow side up ) with a bit of garden hose around the edge to make it soft makes for a cheap, homemade tire changing stand. If you are handy with a welder you can weld a rod in the center to go up through the center of the wheel. this gut just bolted through a couple of steel plates and uses some pvc pipe to cover the ready rod so no scratches. The rod does not need to more than a foot long.

Last edited:
Hail
Moderator
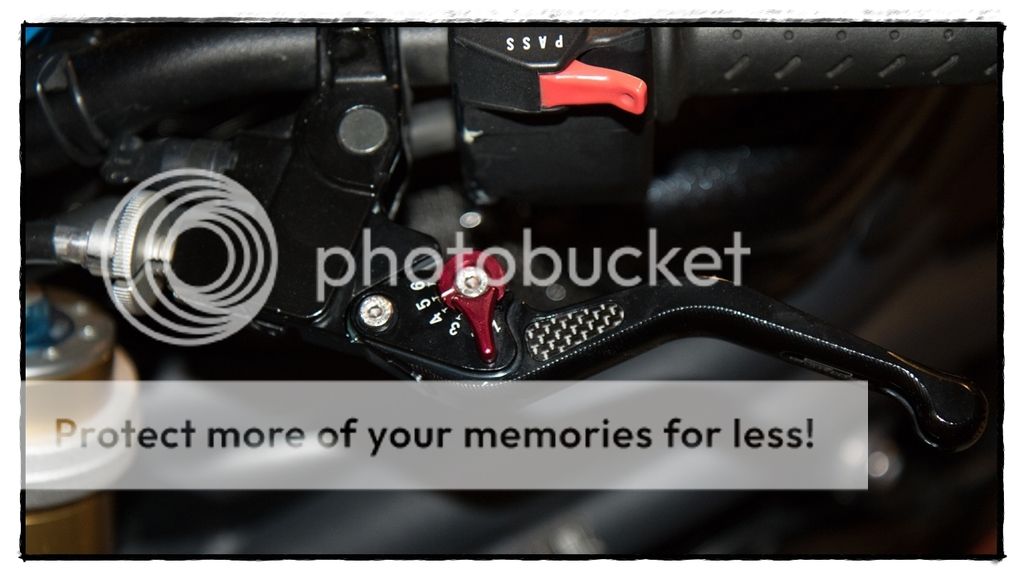
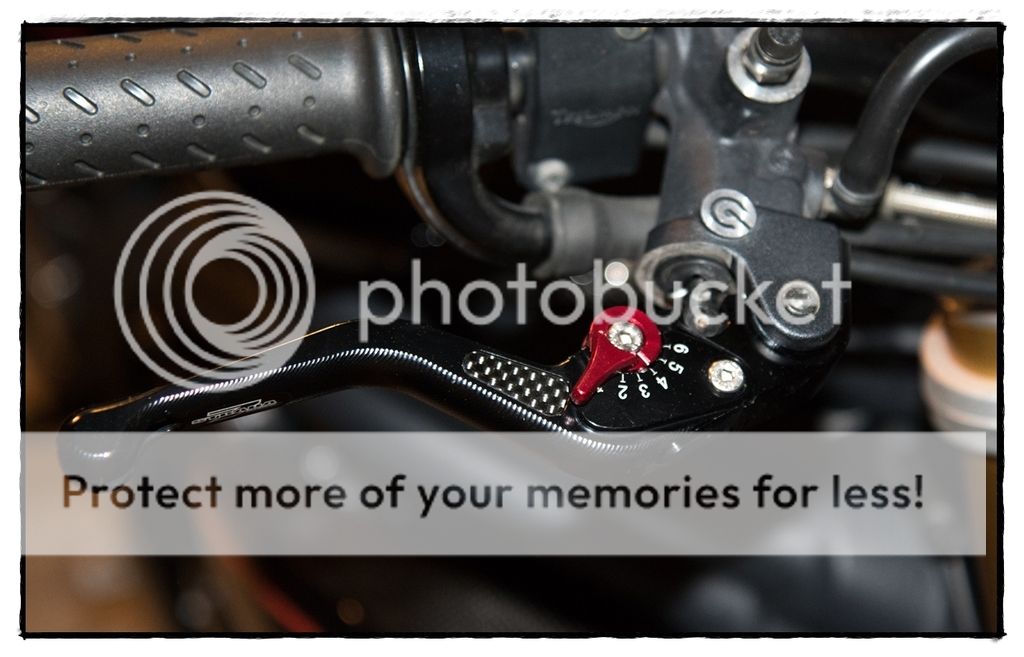
Installed some Strada 7 Racing carbon short adjustable levers on the speed triple.
Blavenia
Wizard
Installed some Strada 7 Racing carbon short adjustable levers on the speed triple.
How do you like them? Where are they made? I saw these available for the KTM and didn't know about the quality. What's your review of this product? Quality levers in your opinion?
Very curious.
Hail
Moderator
Very nice quality. Much better quality and out of the box fit than the $35 Chinese knock offs. More affordable than Pazzo.
I ordered the set off Amazon for about $126 using points.
Not really sure where they are made but I will try to find out.
I ordered the set off Amazon for about $126 using points.
Not really sure where they are made but I will try to find out.
Oldschool
Moderator
Installed some Strada 7 Racing carbon short adjustable levers on the speed triple.
Pictures???
:needpics:
Oldschool
Moderator
Tire changer
I got a start on my "Ghetto" no cost tire change stand. I was getting a bit tired of laying the tires on the floor (on a folded tarp). With an old, scrap steel wheel, a push-rod from a scrap air brake chamber and large washer and two short pieces of steel rod, this came to be. With the help of the mechanic/ welder at work.
I plan to add rubber hose on the top and bottom rim edges to; Protect the spokes, and keep the "stand" from slipping on the floor. I already have an idea for a bead breaker that uses my floor jack for those ultra tough rear tires.

Boredom, the brother of invention......
I got a start on my "Ghetto" no cost tire change stand. I was getting a bit tired of laying the tires on the floor (on a folded tarp). With an old, scrap steel wheel, a push-rod from a scrap air brake chamber and large washer and two short pieces of steel rod, this came to be. With the help of the mechanic/ welder at work.
I plan to add rubber hose on the top and bottom rim edges to; Protect the spokes, and keep the "stand" from slipping on the floor. I already have an idea for a bead breaker that uses my floor jack for those ultra tough rear tires.

Boredom, the brother of invention......
Hail
Moderator
Pictures???
:needpics:
Sorry!


Here is a link to the exact set I got on Amazon. I had enough points on my amex from recent business travel to pay for them.
Amazon.com: Strada 7 Racing Carbon Short Adjustable Levers Pair Black For Triumph Speed Triple R: Automotive
tombraider2
Wizard
4 & 5, hmm Brad, what is that ( PASS ) switch for ? Old school, I got my tire issue fixed. I took it in, they matched my mail order price and went easy on me for labor. Installing tires last night I see the brakes are thin so I'll pick new up today and finish that job.
Oldschool
Moderator
Bead Breaker
With the welding skills of the mechanic at work and my design, the tire changer / bead breaker is done. I might add a stand at some point but for now it is complete and useable.

Stand with soft upper edge (5/8" heater hose) and bead breaker in place.

Heater hose covers the area of the shaft that will go through the bearings on wheel. A small piece of hose protects the top of the shaft (in case I get clumsy). The bead breaker is held in place with two finger tight bolts and washers. It is easily adjustable.

The bead breaking "foot" rests on the soft edge of the rim. It pivots on the bar to adjust for wheel size; straight down for 21". The difference between 18" and a 21" only means 1, 1/2" on the radius, so the foot only changes angle very slightly.
The shaft is from a commercial truck brake push-rod and is high strength steel. The breaker bar is made from two winch snipes (the bar that is used to tighten the winches on a flat-deck trailer) some flat bar and a couple of bolts, nuts and washers. I couldn't find a nice orange paint on the way home last night, so rustoleum gloss black it is.
Heater hose; $7.00 Paint; $8.00 for a total out of pocket of $15.00. Not bad for a tool that could last for as long as I am changing Bike tires.
With the welding skills of the mechanic at work and my design, the tire changer / bead breaker is done. I might add a stand at some point but for now it is complete and useable.

Stand with soft upper edge (5/8" heater hose) and bead breaker in place.

Heater hose covers the area of the shaft that will go through the bearings on wheel. A small piece of hose protects the top of the shaft (in case I get clumsy). The bead breaker is held in place with two finger tight bolts and washers. It is easily adjustable.

The bead breaking "foot" rests on the soft edge of the rim. It pivots on the bar to adjust for wheel size; straight down for 21". The difference between 18" and a 21" only means 1, 1/2" on the radius, so the foot only changes angle very slightly.
The shaft is from a commercial truck brake push-rod and is high strength steel. The breaker bar is made from two winch snipes (the bar that is used to tighten the winches on a flat-deck trailer) some flat bar and a couple of bolts, nuts and washers. I couldn't find a nice orange paint on the way home last night, so rustoleum gloss black it is.
Heater hose; $7.00 Paint; $8.00 for a total out of pocket of $15.00. Not bad for a tool that could last for as long as I am changing Bike tires.
tombraider2
Wizard
Looks good, about as big as a skeet thrower on a tire I had. Store under a bench, take handle off.
Hail
Moderator
4 & 5, hmm
what can I say... It feels right!
Brad, what is that ( PASS ) switch.
It is just for flashing the lights. Spring loaded so it returns to normal lights rather than a rocker switch.
Last edited:

