What did you do to your FZ today?

Boy Pilot! If I had that garage setup, I'd never go into the house! I always wanted to see if anyone liked the Harbor Freight lift. It looks really good. I'm really looking to get one. My old tired back is soooo tired of laying down on the floor. You have a great garage there!
Thanks Billy !
I do enjoy hanging out there. Everyone needs a place to escape to.
My wife enjoys it too as I'm not hanging around the house, bothering her as much . . . and she knows where I am at when she does need me.
And the lift. (anylift actually) You really would love the HF lift. I regret not getting one earlier too. My back loves me more and more now, thanks to the lift. Much less bending over and much less pain.
 
I rode the Cherahola Skyway (for the 2nd time) and the Dragon (the first time) today. Did nearly 450 miles. Really loving the sound of the Yosh TRS, now I can't wait for jetting. I learned I don't like that popping sound on decel at all.

Applied pink dragon sticker.

I think all the pollen went in my eyes they are so itchy!!
 
I did start up the FZ today. I should mention that I forgot to remove my bright orange, rubbery exhaust tip plug. The one you insert to keep wash-water out of the downward sloping pipe . . . wow, it sure did shoot across the garage when I cracked the throttle !
It's OK honey, I'm fine. That dent in the garage door has been there for awhile now.

Don't feel too bad, I have done that to. Mine did not actually shoot out, but it made a really weird whistling and the bright red tag (Remove before flight) flapped loudly! Oops.
 
I'll rub real hard! We're getting cooler weather for the next few days. Might limit my trips to the mountains--feel better?

I had to get pink. It was just two of us from our usual group today. After we passed so many bikes on the Skyway, Tony said I needed a sticker to put on my tail case (which he likes because how clean the install looks) that says "You've just been passed by a girl!"

I didn't see that sticker, so the pink dragon will have to do until I find one. I put one on the spot on the frame that Yamaha must have left for it and another on my tail case (well, I haven't put the one on the case yet cuz I can't figure out where to put it). I have the Twisty Butt sticker on the rear right bottom half and now the dragon sticker somewhere on that case.
 
This weekend I got the Yoshimura (US) carbon slip on.

And I cut the limiter on the bike.

So full power/speed from today :woot:

hsntk6.jpg
 
Installed Givi rack and v35n saddlebags

Got the rack and saddlebags from sporttour.com with free shipping -- great group of folks. Took about 3 hours total to install with no issues encountered whatsoever. Will get some pics uploaded soon.
 
Last edited:
Nothing.... again! I have not ridden her in almost two weeks. No time to spend with her. Today, I walked all around her many times. I was cleaning and organizing the garage so Billy and Tony can actually work in there! :D I've got a bit more to do and we're ready for this coming weekend.
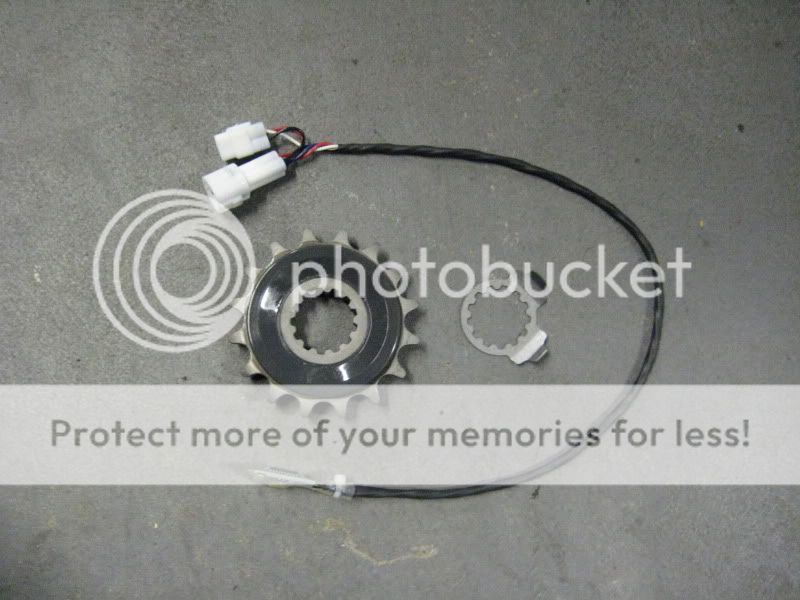
I have to get the decals off the fairing this week. Copperdog parts are expected in the next couple weeks!
 
Don't feel too bad, I have done that to. Mine did not actually shoot out, but it made a really weird whistling and the bright red tag (Remove before flight) flapped loudly! Oops.
Thanks oldschool, I too have a steamer hanging off the stopper. Just wasn't thinking. Reached over, checked for neutral, fired 'er up, seemed abit sluggish, , , and pow !! heh,heh, Glad I didn't blow an engine seal or maybe have a room full of visitors !
I can just hear them now . . .
 
Painting a new aluminum license plate bracket galaxy black. Will be getting my first registration renewal sticker in the mail in a week or two and decided it was time to clean up the rear a bit more.
 
Installed the new Ohlins shock

It was a breeze. Consulted the Service manual for the proper torque on all the bolts involved. Lubed the contact surfaces and bolted and retorqued it back together. The routing of the hydraulic preload line took a couple of minutes and I used heavier Zip ties than were provided. Then I did my "homework". Corrected my homework to within specs The rear was out 5mm, the front out 20mm( both too soft) and called it a night.

newOhlinsshockforFZ.jpg


IMG_0250.jpg


IMG_0248.jpg


Then came in from the Garage and cooked my wife dinner. It was Mother's Day and the kids don't cook much.
 
Last edited:
Graves EXUP Servo Eliminator

Well I came across a great deal on a Graves EXUP eliminator in the local craigslist :). It was from an '05 R1, but fits the FZ1 just the same and for $25 I couldn't say no. Here are some pics of what it looks like and then installed:

IMG_1267.jpg


IMG_1268.jpg


IMG_1272.jpg


My PC V is lonely in there now that the EXUP servo is gone. Wow look at all that room :D

IMG_1269.jpg
 
SpeedoDRD Installed

Also got around to installing the SpeedoDRD in preparation for the upcoming installation of the 16T front sprocket. I did not calibrate it yet as I'll do that after the sprocket change, but from what I have seen from others the correction factor should be around a 10.7-10.8%. I'll try and use a GPS if possible to get a really accurate calibration percentage.

SpeedoDRD, 16T Sprocket and lock washer:
IMG_1274.jpg


SpeedoDRD close up:
IMG_1275.jpg


Speed sensor connector (circled in yellow):
IMG_1271.jpg


Disconnect speed sensor and connect SpeedoDRD harness to either end:
IMG_1277.jpg


I ran the SpeedoDRD harness along the frame under the gas tank and zip tied it in place. Whenever I need to calibrate it, which will only be once provided I don't switch sprocket sizes again, all I have to do is remove the front seat and it's right there:
IMG_1280.jpg
 
RE: FZ1 today

Finally got my replacement parts from YAMAHA today! Still missing my new LED front signals (from Graves), but, while I wait for them to arrive, I decided to go ahead and re-use my original frame sliders (that were damaged in the crash) by mounting them on the back part of the frame. I repaired them, and repainted them of course. I mounted one on the left passenger peg bracket and the other one on the exhaust can bracket. I also installed the new left side stator cover and gasket that came in from YAMAHA. Oh yeah, I received the 2-front cowl seals for sealing around the inner fairings (I believe), but, I don't see how they are supposed to install ? mmmhhhh.
Here are a couple of pics of the relocated frame sliders, the new sliders on the front engine mounts and the hwy bars. The new cowl is fitted up but not firmly attached yet. I need those GRAVES blinkers and then I'll be all set !
 
Blink, blink, blink

Well, I got off work early and finished my custom radiator wing blinkers. I used the same 12v amber LED strips that I used for my running lights. I think I'm more visable now. Sorry, about the quality, but I guess that as good as it gets from an iphone upload.

[ame=http://www.youtube.com/watch?v=ahqoJBK_53s]YouTube - 2007 Yamaha FZ1 custom blinkers[/ame]
 
Opened goodies

My HEL Brake lines arrived today! I was beginning to wonder if they had been lost. Will post photos before and after the install, tomorrow night.
 
Clear Windshield Swap Out

I got my clear shield in the mail on Monday. I had a friend do some polishing on it with a kit he bought for Lexan and Plexi-glass. It took out most all of the scratches and shined up real nice. I ran down this morning before taking Richie to school and removed the dark shield from the bike. I couldn't believe how loose the screws were! Maybe thats the noise I've been hearing up front lately at highway speeds. This afternoon, I ran down to install the clear. I ran a bead of blue locktite to each screw and fastened them, staggering each one. After they were all done I put a 1/4 turn on each one. Of course the last screw snapped!!! It didn't break all the way off but the head is just holding on by a thread. I will have to get one from work tomorrow. I'm sure it's a fine pitch metric bolt, but does anyone know the exact size? It looks to be 4 or 5mm. Here are a couple of shots before and after I finished.

002-22.jpg


004-14.jpg


Broken Bolt Missing
005-13.jpg


007-11.jpg
 
Back
Top