My home built stand

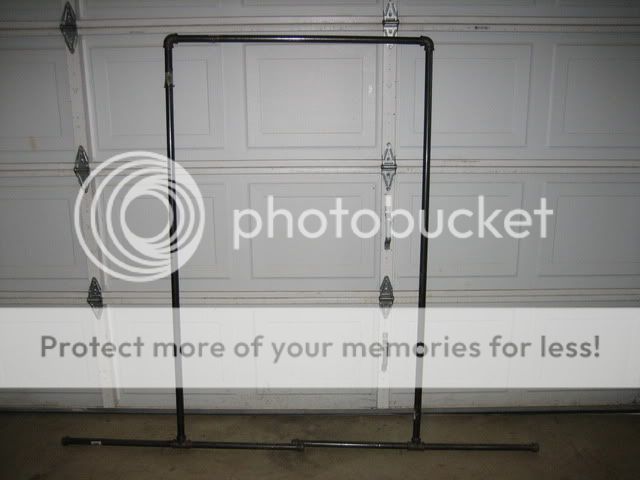
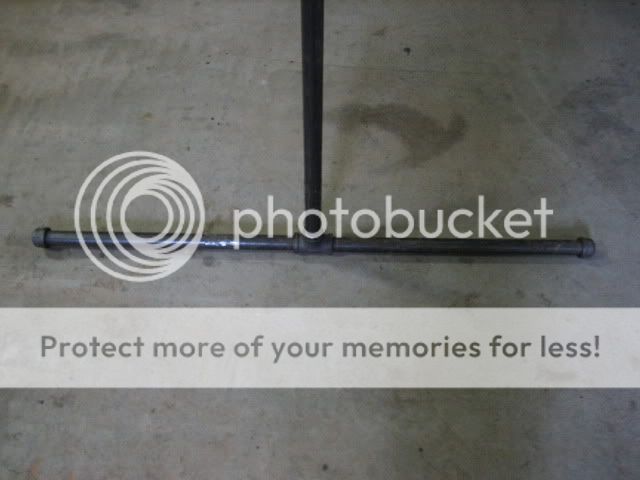
Here's a few pics of a stand I built a few years back to aid in tire changes. I think I used 3/4 inch pipe which makes it sturdy. Works great, and all I have to do is rotate the feet 90 degrees and it rests against the wall for easy storage.
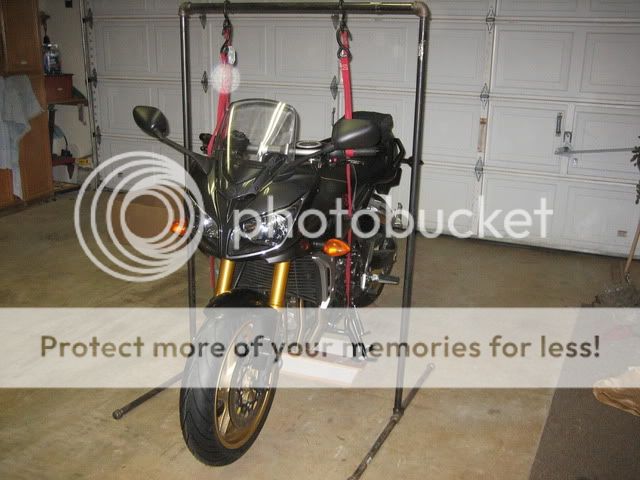
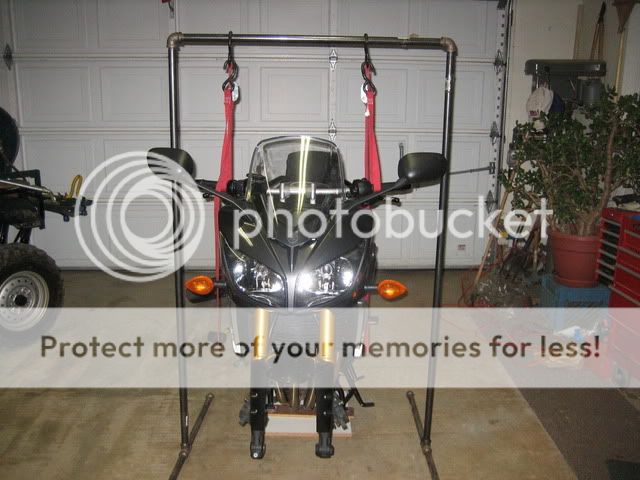
In this pic the both the front and rear are off the ground.
Franksnewrubberinstall010.jpg


Franksnewrubberinstall003.jpg


PM me if you need more info. Doug
 
Ok here's the master plans. Using 3/4 pipe the side upright pipes are 5' the pipe across the top is 3' and the legs are 18"
Franksnewrubberinstall003.jpg


Here it is with the legs folded for easy storage.
homebuiltstand001.jpg


Just use normal elbows
homebuiltstand004.jpg


I did use pipe caps on the ends to balance the stand as it is up on the base elbows. Works well, very solid.
homebuiltstand005.jpg


I have used this stand for years, holds my FJR just fine. You can run straps to the bars or forks or where ever needed. I never liked jacking the bike on the header pipes. Nice part is with the centerstand you can R&R both tires at the same time. Doug
 
I really like this stand as an option!!! Great job! :tup:

Here is my version and I know you've seen this on the FZ6 forum. :D

I did not reinforce the rafters. These are loft rafters, 24" in center. I did do a deflection test using a 2x4 as a story board. After mounting the hoist, I stood the 2x4 on the floor and marked it at the bottom of the beam. I then hoisted her V Star 650 as it was the heaviest bike I had but just enough to clear the floor. I marked the 2x4 again. The deflection was 3/16ths of an inch and it didn't even creek once. :D Perfect!

So, mounting...

(4) 6" long pieces of 4" aluminum angle iron
(4) 3/4" bolts with washers, locking washers and nuts.
(4) 2" U-Bolts
(1) 4' piece of galvanized steel 2" pipe

I sandwiched two rafters with the angle and drilled 3/4" holes, two per. I bolted these to the rafters. Then I marked and drilled the holes for the U-Bolts and loosely attached them. I loosely attached the brackets on the hoist and pulled that up with a rope then took the pipe and a step ladder, slid the pipe through the U-Bolts, then through the brackets and through the second set of U-Bolts. Tightened it all down and tested. Here's a pic...

attachment.php


Here is a pic of the FZ6 on the hoist but please note that her old V Star 650 still outweighed the FZ1 and yes, the FZ1 has been on the hoist.

attachment.php


Last, here is the hoist I purchased. Well, sort of... I traded a 4'x8' utility trailer for the hoist and two wheel chocks. :D BTW! This is on sale and cheaper than I got it!

- Harbor Freight Tools - Quality Tools at the Lowest Prices

While more expensive than the stand version, this is a fairly cheap option for anyone wishing to lift a bike. I also use this to lift heavy items from the back of the truck when I don't want to take them off manually. If only I'd have gotten 12' high doors and ceiling now!!! :D
 
Last edited:
Sorry to tell you this but the pipe idea will get you hurt. The pipe threads create a huge stress riser right a the place you least want it. Right near the ground. The bike will find the ground is a very quick way.

AW
 
Sorry to tell you this but the pipe idea will get you hurt. The pipe threads create a huge stress riser right a the place you least want it. Right near the ground. The bike will find the ground is a very quick way.

AW


Stress Riser What?? English Please, I see no problem with it if your using a heavy guage pipe.
 
I really like this stand as an option!!! Great job! :tup:

Here is my version and I know you've seen this on the FZ6 forum. :D

I did not reinforce the rafters. These are loft rafters, 24" in center. I did do a deflection test using a 2x4 as a story board. After mounting the hoist, I stood the 2x4 on the floor and marked it at the bottom of the beam. I then hoisted her V Star 650 as it was the heaviest bike I had but just enough to clear the floor. I marked the 2x4 again. The deflection was 3/16ths of an inch and it didn't even creek once. :D Perfect!

So, mounting...

(4) 6" long pieces of 4" aluminum angle iron
(4) 3/4" bolts with washers, locking washers and nuts.
(4) 2" U-Bolts
(1) 4' piece of galvanized steel 2" pipe

I sandwiched two rafters with the angle and drilled 3/4" holes, two per. I bolted these to the rafters. Then I marked and drilled the holes for the U-Bolts and loosely attached them. I loosely attached the brackets on the hoist and pulled that up with a rope then took the pipe and a step ladder, slid the pipe through the U-Bolts, then through the brackets and through the second set of U-Bolts. Tightened it all down and tested. Here's a pic...

attachment.php


Here is a pic of the FZ6 on the hoist but please note that her old V Star 650 still outweighed the FZ1 and yes, the FZ1 has been on the hoist.

attachment.php


Last, here is the hoist I purchased. Well, sort of... I traded a 4'x8' utility trailer for the hoist and two wheel chocks. :D BTW! This is on sale and cheaper than I got it!

- Harbor Freight Tools - Quality Tools at the Lowest Prices

While more expensive than the stand version, this is a fairly cheap option for anyone wishing to lift a bike. I also use this to lift heavy items from the back of the truck when I don't want to take them off manually. If only I'd have gotten 12' high doors and ceiling now!!! :D

Yeah, I'm still contemplating on that, got all the hardware except the mounting bar and the hoist... got a spare 3000lbs capacity winch I got from HF and doesn't fit the bill on what I was trying to accomplish with it, does anyone know if that will work for a hoist application?

BTW is it safe to hoist the bike from the handle bar like shown in the above picture?
 
Huh? with 3/4 pipe you (ok a midget) could do pull ups all day long. I don't store it outside so no rust.

I woud like to have FZinNH's set up in the garage and the bedroom:innocent0002:
 
No troubles lifting the bike that way at all. :D

Now the winch... don't know why it wouldn't work. If it will pull 3000 lbs, then it should work fine. Just be very sure that your rafters can take the weight. You can always pop up temporary jack studs whenever you want to lift. I was going to do just that if the deflection test showed too much sag on the first lift. Thankfully, no need though. :tup:
 
well....I may still suggest you put the temp jack studs in becasue looking at your picture, you are putting a larger load then normal on the mending plate that is holding your rafters for the bottom chord of the truss.

it is just a metal plate with a bunch of spikes in it that maybe only penetrate 1/4" or so.....and no other fasteners......

granted, the plywood you have for storage up above, if it is nailed/screwed to the rafters, is helping in carrying some of that load....but is also adding to the weight at hand....

peace of mind......for YOU and your FZ1/6
 
Thanks Adam. Yes, the wafer board for the loft is all screwed to the rafters and the studs that the mending plates are attached to. The larger mending plates closer to the middle are greatly assisted with the loft flooring.

You should see all the stuff in the loft! :eek: :D

I don't lift often and certainly never that high anymore. That lofty-lift was a "show-off" for the camera and to prove to myself it would hold up.
 
That winch on the joists will go nowhere. Joists that size can hold thousands of pounds and they're attached using hurricane straps too, and connected to the other joists... I would inspect the straps periodically - that's your weakest point, but it's never going to fall under a 500 lb bike.

Did you bolt the two side plates together with one bolt through?
 
Back
Top